Acrylic garment racks: durability traps and weight limits
Acrylic garment racks are often chosen for the way they disappear into a room. Clear rods, shelves, and brackets make a closet feel lighter, keep the focus on the clothes, and photograph better than painted steel.
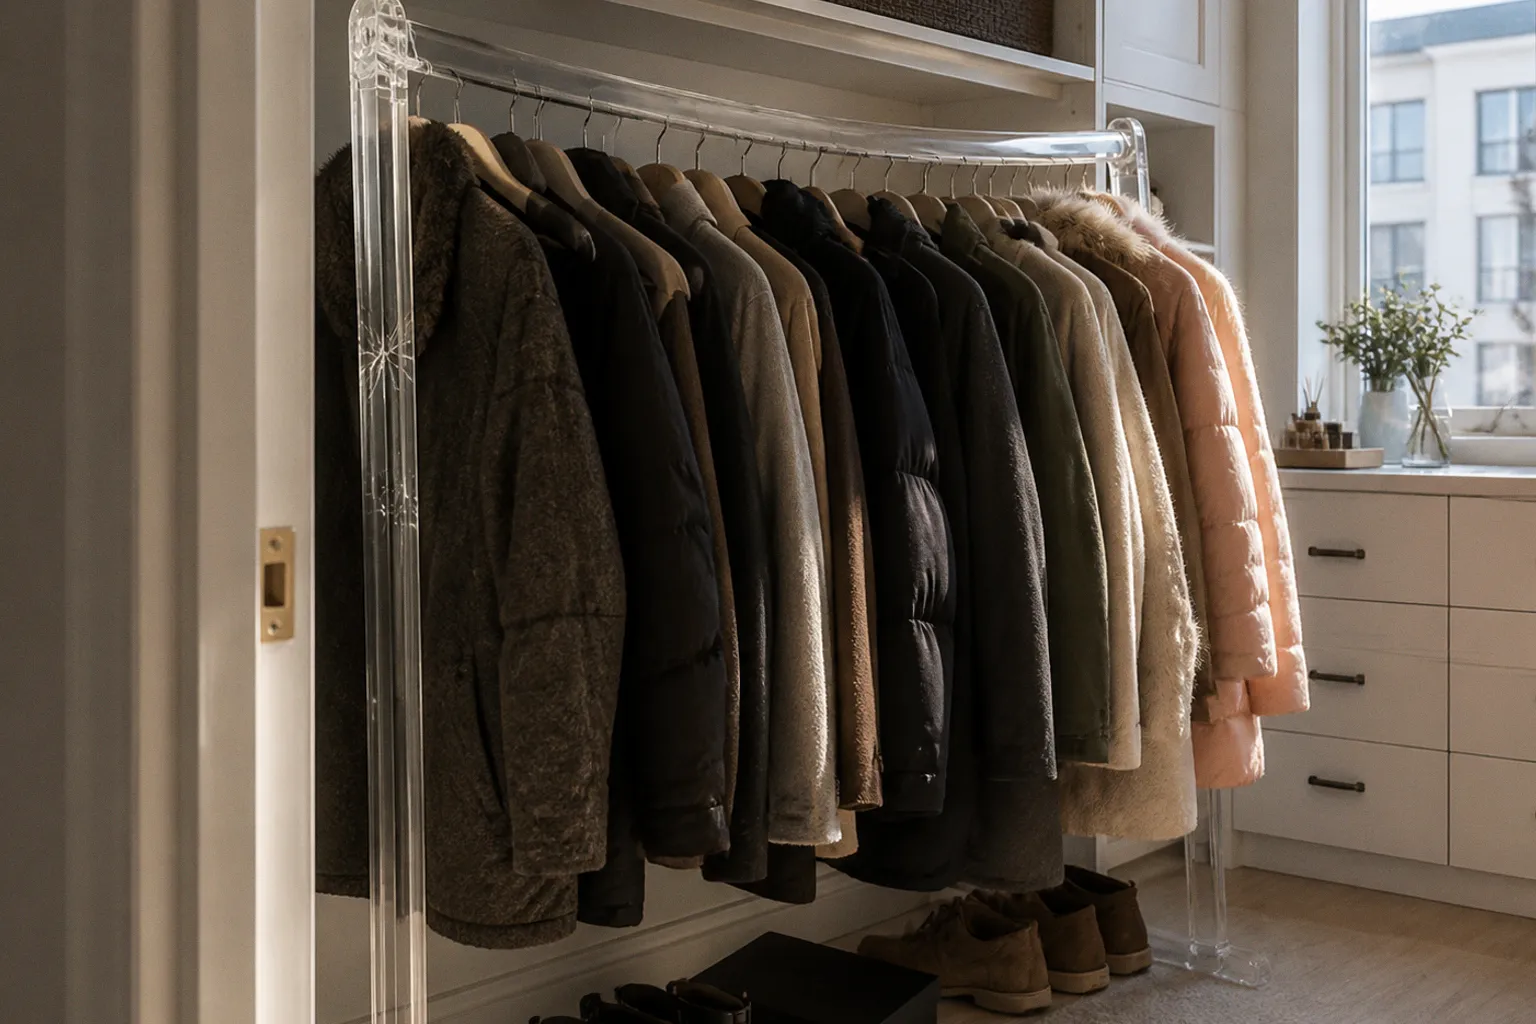
The problem begins when that visual lightness is mistaken for structural lightness.
A clear Lucite clothes rack is not automatically fragile, but neither is it a transparent substitute for stainless steel. Its performance depends on the details that product photographs rarely show: whether the acrylic is cast or extruded, how far it spans between supports, how the load is distributed, whether holes or sharp corners interrupt the section, and how much heat, sunlight, and chemical exposure the part receives.
That is where most acrylic garment rack durability issues come from. The material is asked to behave like a beam, but it is specified like a decorative panel.
Acrylic has a useful load-bearing range. Outside that range, failure is not necessarily dramatic or immediate. A rod may begin with visible sag, develop stress whitening around a bracket, or acquire a network of fine cracks after repeated cleaning. The correct question is therefore not “How much weight can acrylic hold?” It is “How much weight can this particular acrylic section hold across this span, with these supports, in this environment?”
The Physics of Failure: Notch Sensitivity and Stress Cracking
Polymethyl methacrylate, commonly called PMMA or acrylic, is notch-sensitive. A notch is any local interruption that forces stress to flow around it: a drilled hole, a sharp inside corner, a tapped thread, a chipped edge, or a deep scratch. Under bending or tension, the stress at that point can be substantially higher than the average stress calculated from the total load.
That does not mean every notch multiplies stress by a fixed factor. The increase depends on the notch radius, depth, orientation, surface finish, section geometry, and the direction of the applied force. A broad, polished hole with a generous radius behaves differently from a sharp hole drilled through a thin rod. The same nominal load can be tolerable in one design and damaging in another.
This is why a universal rule such as “a 10 kg load on a notched rod equals a 25–40 kg load on an un-notched rod” is not useful engineering. There is no single load-equivalence multiplier for all acrylic garment racks. The relevant comparison has to be made using the actual notch geometry and the manufacturer’s test conditions.
Where cracks usually begin
In a hanging rack, the highest bending stresses generally occur in predictable regions:
- near the middle of a long unsupported span, where bending deflection is greatest;
- near brackets or end supports, where the way the rod is clamped can create local stress;
- around drilled holes, countersinks, slots, and fasteners;
- at sharp internal corners in molded or fabricated parts;
- along scratches or chipped edges on the tensile side of the section.
A crack does not always travel in a perfectly straight line. It follows the local stress field, which changes as the crack grows and as the rod deforms. A crack that starts at a mounting hole may run along the length of the rod, turn toward an edge, or spread through a bracket interface. Once the crack has formed, the remaining section carries the load over a smaller area, increasing the stress at the crack tip.
That creates a feedback loop: load produces a small defect, the defect concentrates stress, the concentrated stress extends the defect, and the reduced section carries the same load less safely.
A scratch is not automatically a structural crack. A light surface mark may be cosmetic, especially on an unloaded panel. But a deep scratch on a load-bearing edge should be treated as a warning rather than polished away and forgotten. Its significance depends on its depth, direction, location, and the stresses in that part of the rack.
On acrylic, the location and shape of a defect matter more than the defect’s appearance in a product photograph.
Drilled mounting holes deserve particular attention. Removing material from a rod reduces its effective cross-section, while the hole edge introduces a new surface where a crack can start. The effect is especially serious when the hole is large relative to the rod diameter or thickness, when the edge is left sharp, or when the fastener is tightened enough to crush the acrylic locally.
A responsible fabricator will typically use rounded transitions, polished or properly finished holes, suitable clearances, and washers or bushings where fasteners pass through the material. The goal is not to make the acrylic indestructible. The goal is to avoid turning a normal mounting detail into a permanent stress concentrator.
The same principle applies to corners. A sharp internal corner in a bracket or shelf support is harder on acrylic than a rounded corner because the stress has less distance over which to redistribute. A radius can reduce the severity of the concentration, but the required radius is a design parameter, not a universal number that can be applied to every component. It should be selected in relation to the part thickness, the expected load, and the fabrication method.
Weight Capacity Realities: Cast vs. Extruded Acrylic Performance
Acrylic load ratings are meaningful only when the conditions behind them are visible. A rating may assume a particular span, thickness, support arrangement, loading pattern, temperature, and safety factor. Remove those conditions and the number becomes a marketing shortcut.
A shelf carrying garments spread across its full depth is not experiencing the same load as a rod carrying several heavy coats concentrated near the center. A rod supported at both ends is not equivalent to one supported at three points. A bracket fastened into a stud or reinforced panel is not equivalent to one installed in drywall with a light-duty anchor. Even the way a hanger touches the rod can matter if it creates a local point load or repeatedly rubs one area.
For a quick comparison, the variables that most affect a clear garment rack look like this:
| Design factor | More favorable condition | More demanding condition |
|---|---|---|
| Span | Short distance between supports | Long unsupported distance |
| Load distribution | Garments spread across several supports | Heavy items clustered near the middle |
| Section | Thick, well-rounded section | Thin section with holes or sharp transitions |
| Material | Properly specified cast acrylic | Thin extruded acrylic used as a structural member |
| Support | Bracket aligned with a strong backing surface | Fastener relying on weak or flexible substrate |
| Environment | Stable, moderate indoor temperature | Heat, direct sun, or repeated temperature changes |
| Surface condition | Smooth, undamaged, chemically compatible surface | Scratches, chips, crazing, or solvent exposure |
Cast acrylic versus extruded acrylic
Cast and extruded acrylic are both PMMA, but their manufacturing histories are different. Cast sheets are formed between molds and commonly offer good optical quality, machining behavior, and resistance to stress cracking. Extruded sheets are produced continuously, usually with tighter control over production volume and cost, but can retain more processing stress and may be less forgiving when heavily machined, bent, or exposed to aggressive chemicals.
The distinction is not absolute. A well-designed extruded component can outperform a poorly designed cast component. Thickness, shape, support, edge quality, and installation still dominate the result. But when a rack is expected to carry sustained clothing loads, the grade and fabrication method should be stated rather than assumed.
| Parameter | Cast acrylic | Extruded acrylic |
|---|---|---|
| Typical production method | Formed from a sheet or part mold | Continuously produced through a die |
| General fabrication behavior | Often easier to machine and polish cleanly | Efficient and economical for repeat production |
| Residual-stress concern | Still possible, especially after machining | Can be more significant in some products |
| Stress-cracking tolerance | Often more forgiving, depending on grade | Requires particular care around holes, solvents, and fasteners |
| Structural suitability | Depends on design and testing | Depends on design and testing |
| Best buying signal | Material grade plus load test | Material grade plus load test |
Neither column supplies a safe load by itself. A seller who names the material but does not specify span, support spacing, section dimensions, and test conditions has not really provided a usable capacity rating.
Span changes everything
For a simple beam, deflection rises rapidly as the unsupported span increases. In practical terms, adding a little more distance between brackets can have a much larger effect than adding the same percentage of weight. This is why a short acrylic rod may feel rigid in a showroom while a visually identical rod bows after installation in a wide wardrobe.
The cross-section matters just as much. A round rod, rectangular bar, hollow tube, and edge-supported shelf do not resist bending in the same way, even when they contain the same amount of acrylic. Orientation also matters: a rectangular section is much stiffer when its greater depth is placed in the direction of bending.
There is no honest universal point at which a rod “yields” based only on a measured number of millimeters. A 3 mm deflection could be insignificant in a short, deep section and unacceptable in a long, slender one. It could also be elastic deflection that disappears after unloading, or it could reflect creep, local crushing, heat exposure, or an already damaged section.
A practical inspection should compare the rod under a known load with its unloaded condition and record the span and temperature. If the shape does not substantially recover after the load is removed and the part has cooled, the rod may have experienced permanent deformation or local damage. That is a reason to stop increasing the load, not a proof that a universal threshold has been crossed.
Creep is quieter than breakage
Acrylic can deform gradually under a sustained load, particularly when the section is slender or the surrounding temperature is elevated. This time-dependent deformation is commonly called creep. It may appear as a slow increase in sag rather than a sudden fracture.
That makes heavy garments a poor test of a rack’s capacity. A rod can hold a load on the day of installation and still become less reliable over time. The risk is affected by:
- the constant portion of the load;
- the span and section geometry;
- the temperature at the rod, not merely the room thermostat;
- the condition of the acrylic and its machined edges;
- the way supports restrain or twist the part;
- the duration of loading.
For a rack intended for wool coats, leather garments, or dense seasonal storage, metal reinforcement is often the sensible solution. An internal metal rod or a metal load path can carry the bending forces while the acrylic remains the visible architectural element. The design should make clear which component is structural. If the metal is merely decorative and the acrylic still carries the full bending load, the apparent reinforcement may provide little protection.
The Crazing Trap: Why Common Cleaners Destroy Lucite
Crazing is a network of fine microcracks that forms in a stressed polymer surface. It is different from a single scratch, although scratches and damaged edges can help initiate it. Acrylic may craze when chemical exposure combines with residual stress from manufacturing, machining, bending, fastening, or load.
This is why the same cleaner can appear harmless on a loose acrylic sample yet damage a loaded rack. The cleaner is not acting on an abstract piece of plastic; it is acting on a surface that may already be under tension around a bracket, hole, edge, or bend.
Common risks include:
- ammonia-containing glass cleaners, which can promote stress cracking in susceptible acrylic parts;
- acetone, MEK, lacquer thinner, and similar solvents, which can attack or dissolve the surface;
- some citrus-based degreasers, depending on their formulation and repeated exposure;
- concentrated alcohol products, especially when used on stressed, warm, or poorly annealed acrylic;
- abrasive powders and dirty cloths, which create scratches that later become stress concentrators.
Alcohol requires more careful wording than a simple “safe below this percentage, unsafe above it” rule. The effect depends on concentration, contact time, temperature, mechanical stress, surface condition, and the specific acrylic formulation. A brief, dilute exposure may not produce an obvious mark, while repeated wiping with a stronger product can create haze or crazing. Unless the manufacturer specifically approves the cleaner, it is safer to avoid alcohol-based products on load-bearing acrylic.
There is no universal “minutes to failure” threshold for cleaner exposure. Crazing may appear quickly under severe conditions, or only after repeated contact. A product that seems acceptable on an unstressed panel may be unsuitable around a tightly fastened bracket. The right standard is compatibility testing or the manufacturer’s cleaning guidance, not a concentration number detached from the rest of the system.
How to clean an acrylic garment rack
Begin by removing dust without dragging it across the surface. Rinse or blow away loose particles where possible. Then use a soft, clean microfiber cloth and lukewarm water with a small amount of mild, pH-neutral dish soap. Keep the cloth free of grit and wash it without fabric softener, which can leave a film.
A sound routine is simple:
1. Remove garments and inspect the rod, brackets, and edges before cleaning.
2. Rinse away loose dust rather than dry-wiping a dusty surface.
3. Wash with diluted mild soap and lukewarm water.
4. Use a second clean cloth to rinse away residue.
5. Pat dry or allow the part to air-dry; do not polish aggressively against a dry, dirty surface.
6. Test any specialty acrylic cleaner on an inconspicuous area before using it near a loaded connection.
Dedicated acrylic cleaners can be appropriate when their instructions identify acrylic or PMMA as a compatible surface. They are not a license to use any glass cleaner on a clear rack. Paper towels are also a poor default because their fibers and trapped particles can produce fine abrasion, especially when the surface is dry.
Those fine marks may be invisible in ordinary light but become obvious under a window or a strong ceiling fixture. They also make later cleaning more difficult: haze scatters light, encourages harder rubbing, and leaves the surface progressively less clear.
The safest acrylic-cleaning method is less aggressive than the one used for glass: remove grit first, use mild soap, and let the cloth do less work.
If a rack has already developed crazing, polishing may improve superficial haze but will not reliably restore the original structural condition. Sanding or aggressive solvent treatment can remove one visible mark while leaving a thinner, more stressed section underneath. A part with branching cracks around a mounting point should be treated as damaged load-bearing hardware and replaced or professionally evaluated.
Thermal and UV Degradation: Protecting Your Investment
Temperature changes the margin available to a loaded acrylic component. PMMA does not need to melt before it becomes a poor choice for a heavily loaded rod. As temperature rises, stiffness decreases, and a load that produces modest deflection at ordinary room conditions can produce substantially more deflection in a hot location.
The exact change depends on the grade, section, span, duration of loading, and support arrangement. There is no reliable rule that every acrylic rack loses a particular percentage of capacity at one universal temperature. A rack installed beside a heater, in a sun-heated enclosure, or in an attic closet should be evaluated using the manufacturer’s temperature rating rather than a generic room-temperature capacity.
Heat can also amplify other problems. A softened rod may sag against a bracket, a fastener may apply more local pressure, and a scratch or drilled hole may become more critical under the same garment load. Repeated heating and cooling can add stress even when the rack never reaches a visibly extreme temperature.
Keep the rack away from:
- heating vents and radiators;
- enclosed spaces that receive strong direct sunlight;
- hot lamps or fixtures placed close to the acrylic;
- windows where a clear door or panel can trap solar heat;
- steam, hot appliances, and areas with large temperature swings.
What causes clear plastic garment rack yellowing?
UV exposure can degrade acrylic over time, but indoor yellowing is not governed by a dependable universal timetable. The result depends on the resin formulation, UV stabilizers, sheet thickness, exposure spectrum, glazing, distance from the window, orientation, and the amount of direct versus filtered daylight.
Some acrylic products are formulated for outdoor use and include UV protection. Others are intended for indoor displays and may have less resistance to prolonged sunlight. “Clear acrylic” is not a sufficient specification. Ask whether the product is UV-stabilized, whether the claim applies to the entire part or only a surface treatment, and whether the manufacturer provides weathering or color-retention data.
Direct sun is the most demanding situation, but indirect daylight is not automatically irrelevant. A rack placed near a bright window may receive much less UV than an outdoor panel while still accumulating exposure over years. The exposure may be uneven: the portion facing the window can change before the shaded side, producing a visible difference in color.
Yellowing is generally a bulk-material problem rather than a superficial stain. Cleaning and polishing cannot remove chromophores distributed through the polymer. Surface polishing may improve scratches or haze, but it cannot turn an aged, yellowed section back into new material.
Protection is therefore mostly about placement and specification:
- choose a grade with a documented UV-stabilization claim when daylight exposure is unavoidable;
- use blinds, curtains, or UV-filtering glazing where direct sun reaches the rack;
- rotate or reposition removable components if uneven exposure is a concern;
- avoid assuming that indoor use means zero UV;
- inspect clear parts under neutral light so gradual color change is easier to notice.
Best Practices for Long-Term Clarity and Structural Integrity
Acrylic garment hardware can work well when the design treats it as an engineered polymer component rather than as clear decoration. The buying decision should start with the load path.
Before installing a rack, identify the answers to these questions:
- What is the unsupported span between load-bearing supports?
- Is the stated capacity for the complete rack or only for a shelf, rod, or bracket?
- Does the rating describe a uniform load, a point load, or a specific number of hangers?
- Are the supports attached to a stud, structural panel, masonry, or a surface anchor?
- Is the acrylic cast or extruded, and what are the section dimensions?
- Are holes, slots, fasteners, or sharp corners located in the loaded section?
- Does the manufacturer state a temperature or UV limit?
- Has the actual configuration been tested, or is the number only a material property?
For a residential hanging rod, the following approach is more defensible than a universal thickness rule:
1. Measure the real span. Do not use the overall width of the wardrobe if intermediate brackets or supports divide the load-bearing distance.
2. Estimate the real load. Include the hangers and the heaviest likely garments, not only the average shirt or dress.
3. Account for concentration. Several coats pushed together in the center create a more demanding condition than the same total mass spread across the rack.
4. Inspect the section. A round tube, solid bar, and flat strip have different bending resistance.
5. Treat every hole and edge as part of the design. Ask how it was drilled, finished, and supported.
6. Use reinforcement when the acrylic is the weak link. A metal insert, rear support, or additional bracket can change the load path more effectively than simply adding decorative thickness.
7. Follow the product-specific rating. If the manufacturer gives a capacity only for a stated span and support arrangement, do not extend it to a different installation.
8. Recheck after loading. Look for increasing sag, whitening, cracks, loose brackets, or local crushing around fasteners.
A small amount of initial deflection is not automatically a failure. Many beam-like components deflect elastically under load. The important distinction is whether the deflection is expected for the design and whether it recovers after unloading. Progressive sag, twisting, new cracks, cloudy stress marks, or a change around a hole are more significant than one isolated measurement.
Likewise, a clear surface is not necessarily a healthy structure. Acrylic can remain visually attractive while developing damage in a hidden bracket interface or on the underside of a rod. Inspection should include the areas that are difficult to see: the lower surface at mid-span, the back of drilled holes, the edges beneath hanger contact points, and the places where the acrylic meets metal.
A good maintenance record does not need to become a laboratory exercise. Note the span, approximate load, installation date, and any change in shape or appearance. If the rack is carrying expensive clothing, take a photograph from the same angle after installation and again during periodic inspection. The comparison is often more useful than an unsupported universal threshold.
The most reliable acrylic clothing rack is not necessarily the thickest or most expensive one. It is the one whose geometry and supports match the load, whose material grade is known, whose fasteners do not create avoidable stress concentrations, and whose environment does not accelerate damage.
Clear acrylic earns its place in residential organization because it can make a storage system feel precise and almost weightless. That effect is worth preserving, but it should not be confused with unlimited capacity. Specify the rack by span, section, supports, load, temperature, and exposure. Use metal where the load path demands it. Keep solvents and abrasive dust away from the surface. Treat cracks and permanent deformation as structural warnings, not cosmetic inconveniences.
The material is predictable when the conditions are specified. The mistakes begin when a generic thickness, a flattering product photograph, or a single weight number is asked to stand in for the entire design.