Wall mounted garment racks: common installation traps
A wall-mounted garment rail can fail while its steel tube still looks perfectly straight.
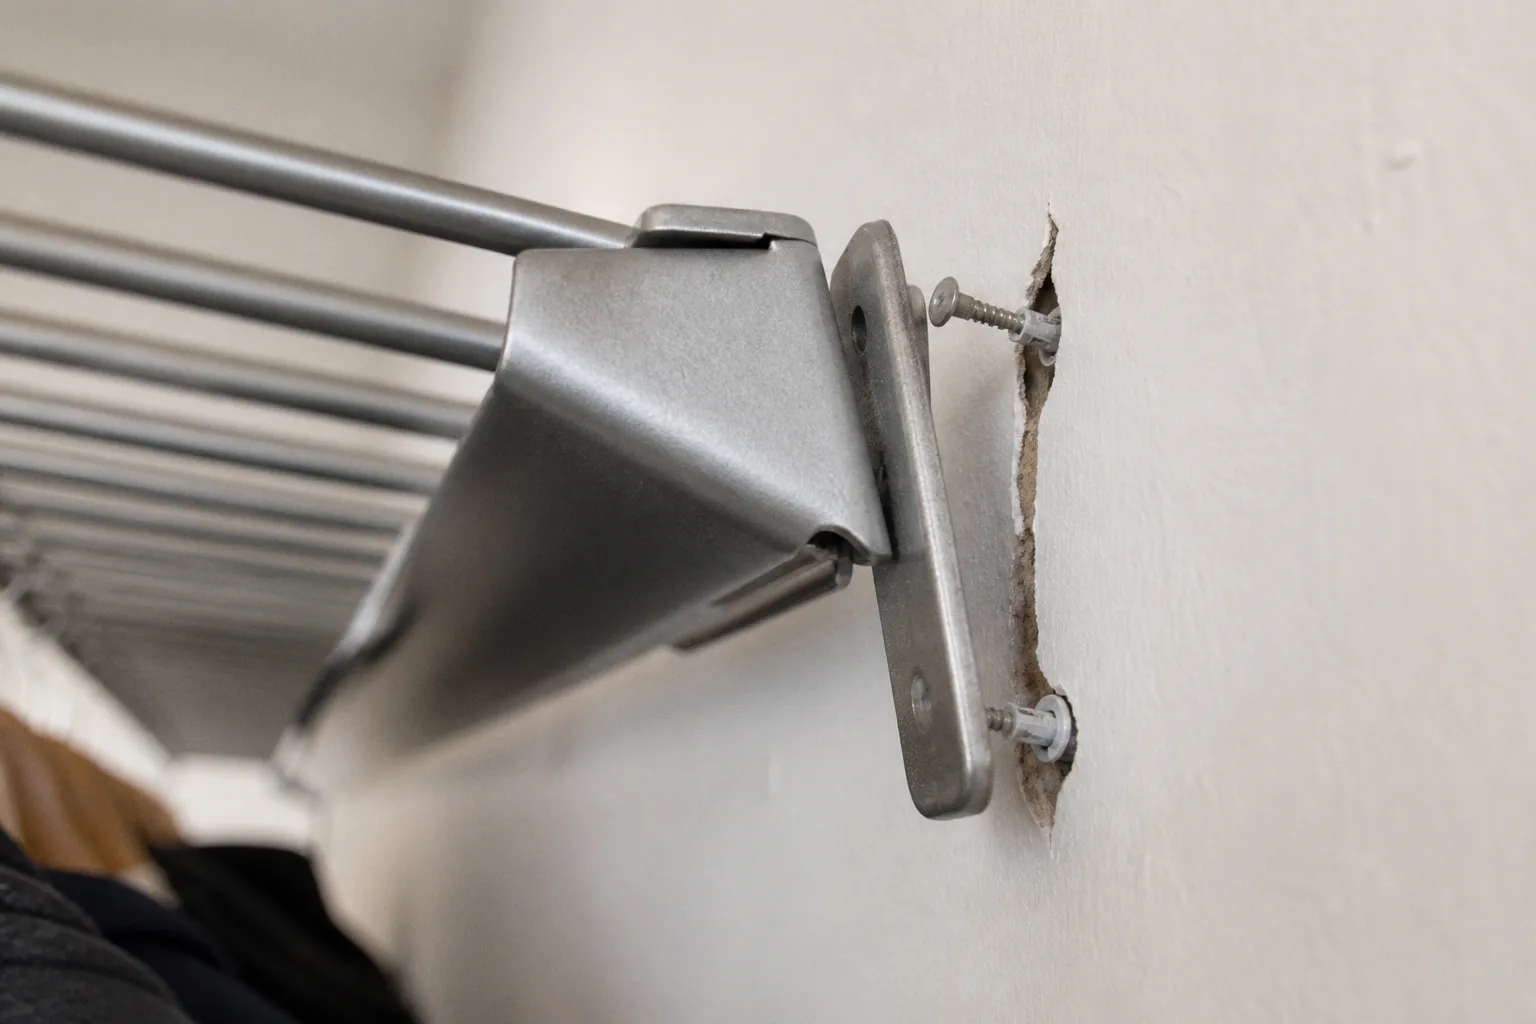
The weak point is often somewhere else: a fastener pulling through drywall, a bracket fixed just outside the center of a stud, a rail installed slightly out of level, or a load rating treated as a promise rather than a set of conditions.
The IKEA BOAXEL 23 5/8-inch clothes rail, for example, is published with a maximum load of 44 lb when the load is evenly distributed and the system is installed as specified. That does not mean the rail can safely support the same weight concentrated at one end, attached to unsuitable anchors, or used as a convenient handhold. The number belongs to the complete installation context: rail, brackets, fasteners, wall, spacing, and the way the clothes are actually hung.
The recurring installation traps are not mysterious. They come down to five variables: wall substrate, hardware selection, anchor spacing, load distribution, and mounting height. The visual design of a storage system may be simple. The load path behind it is not.
The Structural Reality: Why Wall Type Dictates Hardware Choice
Wall construction is the first and most consequential decision. Drywall, a wood-stud bay, poured concrete, hollow masonry, and a metal-stud partition do not offer the same kind of resistance to a fastener. A screw that is appropriate for one wall can be nearly decorative in another.
Selecting hardware because it is included in the box is one of the most common mistakes in residential garment-rack installation. Included hardware may be suitable for a particular substrate, or it may be intended to cover only a limited range of conditions. Before drilling, identify what the fastener will actually engage.
Drywall: Use the Anchor as a System, Not a Substitute for Structure
Gypsum drywall has limited resistance to pull-out by itself. A small plastic expansion anchor can be adequate for a light accessory, but a loaded garment rack creates a combination of downward shear and outward pull that is much less forgiving. The longer the rail, the deeper the clothes project from the wall, and the more uneven the load, the more demanding the connection becomes.
For drywall-mounted systems, manufacturers commonly specify toggle-style anchors or other hollow-wall fasteners with a load rating for the actual panel thickness. These anchors spread the load over the rear face of the board instead of relying on a small plug crushing its way through the gypsum. That can make them a more appropriate choice for a rack, but it does not make every toggle bolt interchangeable or every drywall installation adequate.
The rating depends on several details:
- the thickness and condition of the drywall;
- the anchor’s design and published capacity;
- the diameter and depth of the drilled hole;
- the distance between anchors and the edge of the panel;
- whether the bracket is bearing flat against the wall;
- and whether the load is centered or pulling outward from the wall.
A damaged, damp, patched, or loosely attached drywall panel should not be treated like sound board. If the rack will carry heavy coats, a dense row of garments, or frequent side-to-side handling, locating a wood stud or adding proper structural backing is usually a better design decision than asking hollow-wall anchors to do all the work.
ClosetMaid specifies a 1/2-inch hole and toggle bolts for some of its drywall-mounted systems. Follow the instructions for the specific product rather than treating that detail as a universal recipe. The anchor must be compatible with both the panel and the bracket hole, and it must be installed without enlarging or damaging the drywall.
Drywall anchors distribute a load; they do not turn drywall into a stud. The wall still sets the limit.
Wood Studs: Strong, but Only When the Screw Is Actually in the Stud
A wood stud is generally the most dependable fastening point for a residential garment rack, provided the screw enters sound wood near the center of the member and reaches the required embedment. The common failure is not that the stud is weak. It is that the installer has missed it, caught only its edge, or driven the screw at an angle.
Studs are often laid out at 16-inch or 24-inch centers, but the finished wall can conceal the exact position. Framing around doors, corners, plumbing, and older alterations may not follow the expected pattern. Use a stud finder, confirm the location with a small pilot hole where appropriate, and mark the usable centerline rather than assuming that the first detection is precise.
Bracket geometry can create a second problem. A rail may be positioned exactly where it works best for clothing, while the nearest stud is a few inches away from the bracket holes. Do not solve that mismatch by driving a long screw diagonally into the stud margin. Move the bracket, use a mounting board secured to verified framing, or choose a system designed for the available structure.
The screw length must account for the bracket thickness, any spacer or mounting board, the drywall, and the required penetration into the stud. A screw that is long enough on paper can still be unsuitable if it exits into a pipe or cable route. Perpendicular installation also matters: an angled screw changes how the bracket bears against the wall and can reduce the reliability of the connection.
Concrete and Masonry: Match the Anchor to the Material
Concrete and masonry are not one category. Poured concrete, solid concrete block, hollow block, brick, and mortar joints respond differently to drilling and expansion.
An expansion anchor can be appropriate for sound poured concrete when its diameter, embedment, spacing, and installation torque match the manufacturer’s data. It is not automatically suitable for a hollow masonry cell. In hollow block, an anchor may need to engage the face shell, a web, or a resin-filled zone, depending on the product. Drilling into an empty cell and relying on friction alone is a recipe for an uncertain connection.
Brick presents its own constraints. The brick may be strong, but old or perforated brick can crack under aggressive expansion. Mortar joints are usually a poor choice for a heavily loaded rack unless the fastening system specifically permits them. The hole must also be cleaned correctly; dust left in the bore can prevent an anchor from seating or bonding as intended.
For masonry installations, check:
- whether the wall is solid or hollow;
- whether the hole is in brick, block, concrete, or mortar;
- the required drill mode and bit type;
- the minimum edge and anchor spacing;
- the specified embedment depth;
- and the anchor’s approved load for that substrate.
The product’s engineering data matters more than a generic “concrete anchor” label. If the wall condition is uncertain, use a fastening method that has been evaluated for that exact material or have the installation assessed before loading the rack.
Metal Studs: A Partition Frame Is Not the Same as a Wood Stud
Residential metal studs can look reassuring on a detector and still provide limited thread engagement. Thin-gauge framing is not equivalent to a solid timber member, particularly when the rack is pulled outward by deep garments or loaded unevenly.
Some manufacturers advise against relying on typical metal studs for wall-mounted garment systems and instead specify toggle anchors through the drywall. Other systems permit fastening to metal framing only with particular screws, reinforcing plates, or blocking. The correct choice belongs to the rack and framing system, not to a general rule about all metal studs.
If the metal framing is accessible before the wall is closed, install suitable blocking or a continuous backing board. In an existing wall, locate the stud, establish whether it is structural enough for the intended system, and follow the rack manufacturer’s fastening instructions. Do not assume that a screw holding a lightweight shelf will perform the same way under a full rail of winter clothing.
| Wall substrate | Hardware direction | Main condition to verify | Typical concern |
|---|---|---|---|
| Drywall without framing behind the bracket | Toggle or other hollow-wall anchor specified for the panel | Panel thickness, anchor rating, spacing, and bracket fit | Panel crush or anchor pull-through |
| Wood stud | Structural screw into sound wood | Stud center, embedment, screw length, and service clearance | Edge capture, missed stud, or angled installation |
| Poured concrete | Approved concrete anchor | Hole diameter, depth, cleaning, spacing, and torque | Poor seating or reduced performance in cracked concrete |
| Hollow masonry | Sleeve, resin, or other system approved for hollow block | Face-shell/web engagement and cell location | Shell or web failure |
| Metal-stud partition | Manufacturer-approved toggle, screw, or reinforced backing | Gauge, framing layout, and whether the stud is intended to carry the load | Limited thread engagement or strip-through |
These are fastening directions, not universal capacity figures. The rack’s own instructions and the anchor manufacturer’s data take priority.
Mapping the Hidden Hazards: Detecting Pipes and Cables Before You Drill
A wall can be structurally suitable and still be unsafe to drill. Electrical cables, water lines, heating pipes, data wiring, and mechanical services may pass through the exact zone where a rail needs to be mounted.
Scan the full mounting area before marking the final holes. A basic stud finder can help locate framing, but it is not a substitute for a detector designed to identify live wiring or metal services. Use the tool according to its instructions, scan in more than one direction, and treat an inconsistent reading as a reason to investigate rather than as permission to drill.
Mark possible service routes with painter’s tape. Look at the opposite side of the wall and the rooms above and below it. A bathroom, radiator, utility closet, or electrical panel on the other side provides useful context. If the planned hole is close to a suspected cable or pipe, relocate the bracket or obtain a more reliable assessment. Never assume that a breaker being switched off makes drilling into an unknown cable acceptable.
Concealed Obstructions Beyond Cables
Pipes and wires are the immediate hazards, but the less dramatic obstructions can also ruin an installation. Baseboard heaters, radiator pipes, air ducts, trim, corner beads, door casings, and structural blocking all affect where the bracket can sit.
A rail mounted too close to a heater may expose garments to unnecessary heat and prevent the hangers from clearing the wall. A bracket placed behind a radiator pipe may be forced outward, leaving the fastener partly loaded in a direction the system was not designed to handle. A baseboard can hold the lower edge of a bracket away from the wall, creating a gap that has to be resolved with an appropriate spacer rather than by simply tightening the screw harder.
IKEA’s planning guidance for storage systems emphasizes measuring height, width, and depth while accounting for pipes, radiators, sloping ceilings, and other fixed features. The principle applies to any wall-mounted garment rack: measure the usable plane, not just the empty rectangle visible from the doorway.
Precision Spacing and Alignment: Avoiding Modular System Failures
Modular systems such as ShelfTrack, BOAXEL, and similar standards-and-brackets arrangements depend on alignment. The parts may fit together even when the wall marks are slightly wrong, but the resulting load path can be uneven and difficult to correct later.
A tilted rail is not merely unattractive. Gravity moves hangers toward the low side, and a bracket that was expected to share the load may end up carrying much more of it. The same problem appears when one standard is mounted farther from the rail end than the instructions allow or when the standards are not in the same vertical plane.
Standard Spacing: Follow the Product’s Maximum, Not a Convenient Layout
ClosetMaid specifies that some ShelfTrack standards should be no more than 24 inches apart, with the nearest standard no more than 4 inches from the end of a shelf or rail. Those dimensions belong to that system’s tested configuration. They should not be generalized to every wall rack, but they illustrate why the manufacturer’s spacing limit matters.
Spacing controls the unsupported span between supports. As the span grows, the rail or shelf bends more under the same load, and the fasteners at the ends experience greater leverage. A 48-inch rail may need a different bracket arrangement from a 24-inch rail even when the total weight of clothing is identical.
When planning a modular installation, draw the bracket or standard positions over the actual wall rather than over an idealized closet width. Check whether a required position lands on a stud, a service route, a corner, or a patch in the drywall. If it does, redesign the layout before drilling. Adding a support can reduce the demand on the rail, but only if the support is connected to the wall with hardware appropriate for that wall.
Rail Alignment and the Small Error That Becomes a Load Problem
IKEA specifies diagonal mounting for some BOAXEL fittings so the clothes rail settles into its final position during assembly. That detail is easy to dismiss because the finished system may appear level by eye. Use a spirit level for the final check, and fasten the wall uprights only after the horizontal and vertical references have been confirmed.
Do not correct a misaligned bracket by forcing the rail into place. Forced assembly can preload the fittings, twist the uprights, or leave one bracket bearing against the wall while another is held away from it. The rail may look secure until clothing is added.
Level the rail before it carries clothing. Once the load is on, a small alignment error becomes a distribution problem.
A useful sequence is:
1. Mark the reference height with a level line.
2. Position the first standard or bracket and confirm the wall condition behind it.
3. Transfer the spacing from the product instructions rather than measuring from a crooked wall edge.
4. Install the remaining supports loosely.
5. Check level, plumb, and bracket seating.
6. Tighten the fasteners without crushing the drywall or deforming a thin bracket.
7. Add the rail and test it with a modest load before filling the system.
Floor Clearance for Bottom Components
Bottom baskets and drawers create a different kind of stress. If a mesh basket is mounted too close to the floor, it can catch on carpet pile, a baseboard, or an uneven floor surface. The user then pulls harder, and that repeated lateral force travels through the basket runners into the uprights and wall fasteners.
IKEA recommends placing a bottom BOAXEL basket about 15 cm, or roughly 6 inches, above the floor so it can operate without striking the surface. Use the product’s own clearance requirement where it differs. Check the clearance with the actual flooring installed; a basket that moves freely over bare subfloor may jam once a thick carpet or threshold is present.
Load Dynamics: Understanding Weight Distribution and Rack Capacity
A garment rack’s published capacity is not a property of the rail alone. It is a statement about a particular assembly under particular loading conditions. The weakest part of the load path may be the tube, the bracket, the weld, the screw, the anchor, the substrate, or the connection between modular components.
That is why two racks with similar-looking rails can have very different installation requirements.
Even Distribution Is a Condition of the Rating
The BOAXEL 23 5/8-inch rail is one useful example: its published 44 lb maximum applies when the load is evenly distributed and the system is installed according to the manufacturer’s instructions. If dense coats are pushed to one end, the total mass may remain below the headline number while the local force at that bracket increases significantly.
Users do not load rails like laboratory test fixtures. They group coats by season, hang bags from the nearest convenient point, and pull garments sideways when choosing what to wear. A sound installation anticipates that behavior instead of assuming that every hanger will remain evenly spaced.
For an uneven load, examine the worst likely concentration:
- the heaviest garment group at one end;
- bags or accessories hanging from a bracket or rail end;
- wet clothing, which is heavier than the same clothing when dry;
- repeated sideways pulling;
- and any temptation to use the rail as a support while reaching.
The chosen system should have a manufacturer-published capacity that covers the intended arrangement, not merely the empty rail’s total. If the instructions provide separate limits for evenly distributed and point loads, use the more restrictive condition that matches the real use. If they do not address the intended load pattern, choose a more robust configuration or obtain guidance from the manufacturer rather than inventing a conversion factor.
Span, Support, and Deflection
Long spans are demanding because the rail must resist bending between supports. A rail that is satisfactory at a short closet section may deflect noticeably when extended across the full width of a room. Deflection is not automatically a failure, but visible sag is a warning that the span, load, or support arrangement is outside the comfortable range of the system.
Do not apply a universal “center support required” rule to every 48-, 60-, or 72-inch rack. Some products are engineered for those spans with specified brackets; others require intermediate supports, a different rail, or a lower load. The decision depends on the product’s span table, rail diameter and material, bracket design, and the way the supports connect to the wall.
A center bracket also helps only when it is properly anchored. Adding a bracket to a weak section of drywall does not automatically improve the installation and can create a false sense of security. Before adding or removing supports, check the manufacturer’s layout and determine whether the new position can be fastened into an appropriate substrate.
The Difference Between Static and Real-World Loading
A static rating describes a controlled test or stated condition. Real closets produce movement. Garments are pulled sideways, hangers collide, baskets are opened, and a person may briefly lean on a rail. Those actions can create short-duration forces that are not represented by a simple evenly distributed weight.
This does not mean that every ordinary use is dangerous. It means the installation should not be designed right at the published limit. Leave a sensible margin, keep heavy items close to well-supported areas, and do not use a garment rack as a grab bar, ladder, or shelf for objects that were not included in its intended use.
Wet garments deserve special attention. A raincoat or towel may not seem unusually heavy on its own, but several wet items concentrated on one side can change the load pattern quickly. If the rack is intended for laundry, specify a system whose documentation addresses that use rather than relying on the rating for ordinary dry clothing.
Preventing Wall Damage From Heavy Clothing
Wall damage usually begins as movement rather than a dramatic pull-out. The bracket flexes slightly, the screw head presses into the drywall, or the anchor shifts inside an oversized hole. Each loading cycle enlarges the damage. Eventually the bracket no longer sits tightly against the wall, and the next load produces more leverage.
After installation, inspect for:
- a growing gap between bracket and wall;
- crushed or polished drywall around the fastener;
- cracking that radiates from the hole;
- a rail that no longer returns to level;
- loose standards or rattling brackets;
- and unusual creaking when garments are moved.
If any of these appear, unload the rack and investigate the connection. Tightening the screw may conceal the symptom while worsening the drywall or stripping the anchor. A damaged hole often needs a new anchor location, a backing board, or a different fastening method.
Strategic Height Planning for Functional Closet Layouts
Mounting height determines whether a rack is useful every day or becomes a display that requires a step stool. It also determines whether garments clear the floor, baskets, doors, shelves, and neighboring storage.
Typical Rod Heights by Garment Type
Closet Place lists these common planning heights, measured from the finished floor to the center of the rod:
- Short hanging: about 40 inches for shirts and folded trousers.
- Medium hanging: about 48 inches for jackets and blazers.
- Tall hanging: about 65 inches for dresses, coats, and other long garments.
These are planning guidelines, not code requirements. The actual height should reflect garment length, the user’s reach, the hanger type, and the geometry of the rack. A 65-inch rod may work well for tall users and long garments but become inconvenient for a shorter person who must reach over a deep shelf.
Measure the longest garments that will actually live on the rail. Include the hanger hook above the rod and allow clearance below the hem. A rack that is technically high enough for a dress may still be impractical if the dress drags on a basket, bench, or floor-level obstruction.
Double Hanging and Room Height
Double hanging is often planned as two sections of roughly 40 inches, one above the other. That arrangement needs room for the rod diameter, hanger hooks, garment clearance, bracket depth, and a usable gap between the two levels. A room with a 7-foot ceiling may make the arrangement possible, but the upper rail can be uncomfortable to reach and the lower section may need to be compressed.
In an 8-foot room, the upper rod has more breathing room, but the final height still depends on the storage system and the person using it. Do not place the upper rail by dividing the wall height in half. First establish the lower garment clearance, then account for the upper garment length and the reach required to use the upper level.
Clearance for Doors and Adjacent Systems
IKEA specifies additional height clearance for some PAX wardrobe frames: 1/2 inch for hinged doors and 2 inches for sliding doors. The exact requirement belongs to that product, but the underlying issue is universal. Doors need space to swing, slide, and clear the clothing hanging beside them.
For a wall-mounted rack near a closet door, measure the complete swing arc or slide path. Then account for the hanger hook above the rod, the shoulder depth of the clothing, and the distance the garments project beyond the rail end. A bracket that appears to clear the frame when empty may obstruct the door once a jacket is hanging from it.
Also check adjacent shelves, drawers, light switches, and trim. The rack should be usable with one hand while the other door or drawer is open. A few minutes with a tape measure can prevent a system that technically fits but cannot be operated without moving half the closet.
The Installation Decision Is Conditional, Not Binary
There is no single fastener, spacing pattern, or load number that makes every wall-mounted garment rack safe. The correct installation is the one that matches the product documentation to the actual wall, span, load pattern, and surrounding clearance.
Start by identifying the wall and locating concealed services. Then compare the available bracket positions with studs, blocking, or approved hollow-wall anchor locations. Confirm the product’s maximum span and spacing, install the supports level, and calculate the intended load using the manufacturer’s stated conditions. If the planned use includes wet garments, unusually heavy coats, bags, or frequent side loading, treat that as a different design case rather than quietly adding it to an ordinary clothing rating.
The practical test is not whether the rack feels solid when empty. It is whether every part of the load path remains appropriate when the system is installed on the stated substrate, loaded in the way people will actually use it, and given enough clearance to operate without being pushed or twisted.
A well-installed garment rack is not defined by one impressive anchor or a generous-looking rail. It is defined by a chain of compatible decisions: the right support, the right hardware, the right spacing, and a load that stays within the product-specific conditions. That is how you prevent wall damage from heavy clothing without turning a simple closet upgrade into a recurring repair.