Sloped ceiling closet racks: layout planning milestones
Angled drywall cannot accept a point load from a garment rod without an anchor that transfers stress into framing. That single mechanical fact governs every layout decision under a sloped ceiling.
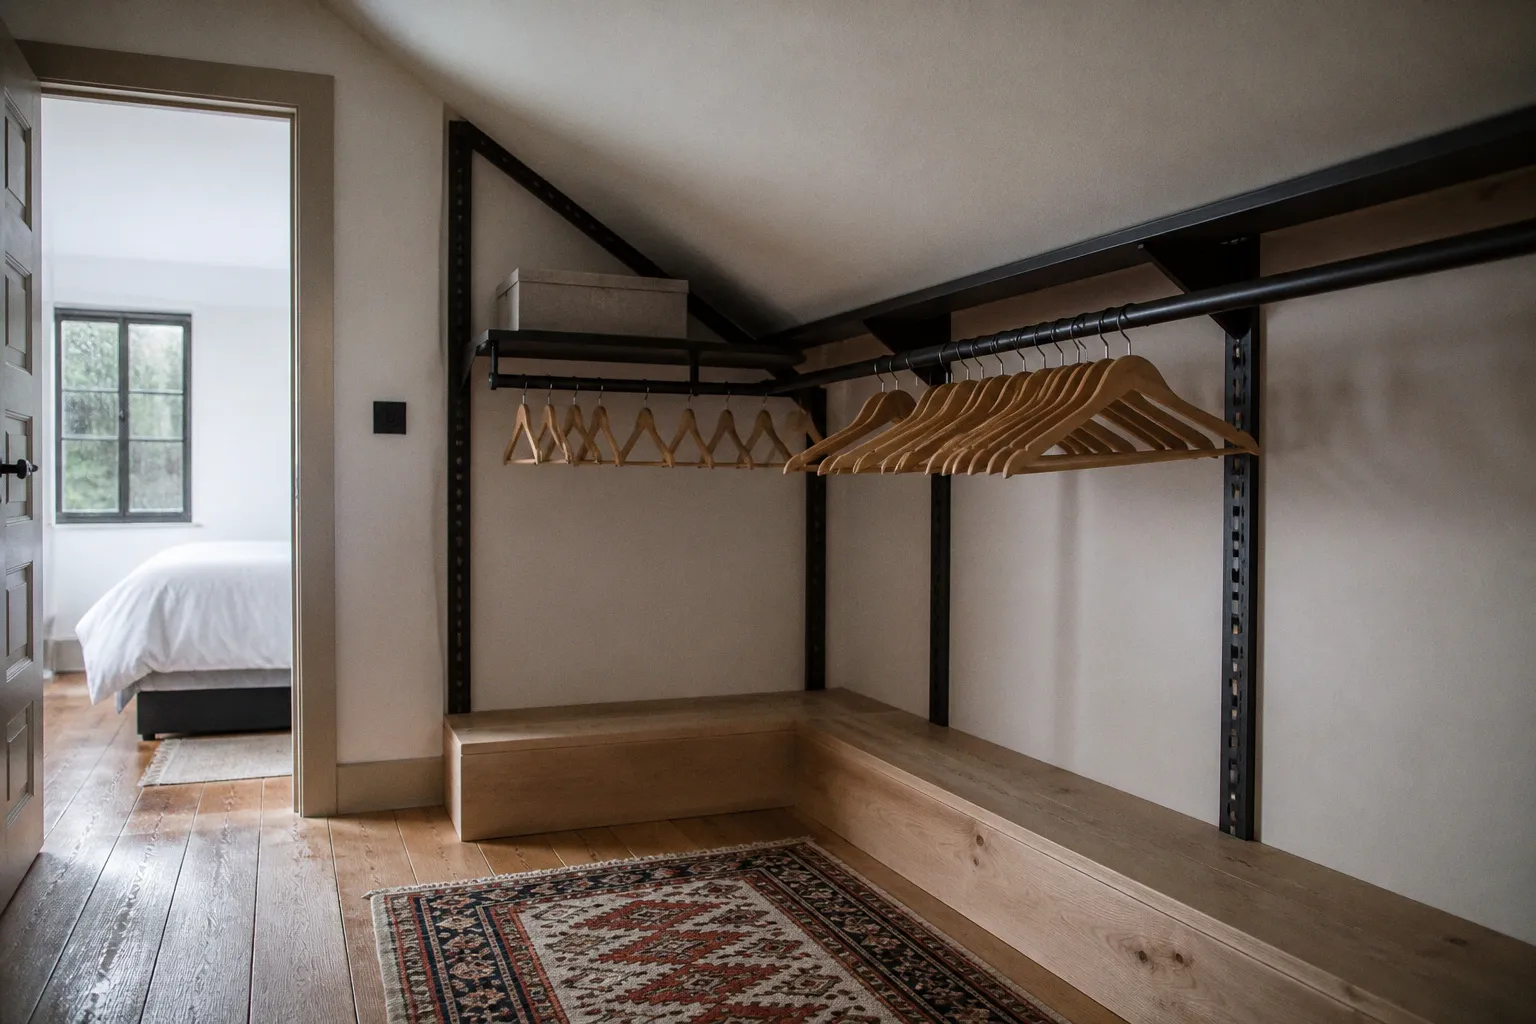
Sloped Ceiling Closet Rack Layout: Mapping the Geometry Before You Drill
Most failed closet builds in attic conversions are not failures of carpentry — they are failures of geometry measured before any bracket is mounted. The plan below proceeds in the order the wall itself dictates: find the pitch point, dimension the depth, verify the vertical clearances, then resolve how the rack will be anchored where the wall is no longer vertical.
Mapping the Geometry: Identifying Pitch Points and Usable Zones
The pitch point is the exact location on the back wall or ceiling where a flat, vertical surface transitions into an angled plane. Measure it before measuring anything else. Walk the wall with a 4-foot level and a laser plumb line; mark each transition in pencil on the drywall. In most residential attics the pitch point sits 4 to 8 feet off the finished floor, depending on roof truss geometry and ceiling height. Below that line, the wall is plumb and behaves like any standard closet partition. Above it, every dimension becomes a variable that shortens as you move outward toward the eaves.
Translate the marks into three usable height zones:
- Dead zone (low eaves, 0–40 inches from floor). Acceptable only for short drawers, shoe racks, or low-profile bins. Garment rods will not function here.
- Working zone (40–84 inches from floor). The dominant area for double-hang, single-hang, and folded-garment storage. Mount most active storage in this band.
- Dead zone (high eaves, above 84 inches). Reserved for shelving, off-season storage, or low-density items. Hanger clearance is exhausted above this band on most slopes.
A useful exercise: stretch a chalk line along the slope and drop vertical plumb lines at 12-inch intervals. Where the sloped ceiling falls below the 66-inch minimum single-hang clearance, that horizontal segment of the wall cannot carry a hanging rod without modification. Mark those segments directly on the stud layout. The map you produce is the only document that determines which rack system fits and which does not.
Hanger Clearance and Depth Requirements for Angled Spaces
Standard clothes hangers measure 17 to 19 inches across the shoulders. A rod mounted perpendicular to the back wall requires roughly 24 inches of horizontal depth from wall to rod tip so the hanger sits square and clears the drywall behind it. Under a sloped ceiling this depth requirement does not change — what changes is the vertical dimension available at the rod tip. As the slope descends toward the eaves, vertical clearance at the rod tip collapses first while horizontal depth remains constant. Rods mounted near the eave drop below usable hanger height long before the depth itself becomes the limiting factor.
Two depth references govern the floor plan in front of the rack:
| Clearance reference | Distance | Function |
|---|---|---|
| Minimum walkway | 24 inches (61 cm) | Allows a person to stand, view garments, and remove one without brushing the opposite wall |
| Comfortable walkway | 36 inches (91 cm) | Required for opening drawers fully and accessing deep shelves without contortion |
If the floor area in front of the sloped section is narrower than 24 inches at any point, do not place a hanging rod at that location. Use shelving or closed cabinets instead. The 24-inch minimum is not a guideline — it is the operational floor for any clothing storage that requires user interaction.
For full wall-to-wall built-in configurations, subtract 1/4 inch (6.35 mm) from the total wall width when sizing the outer rack frame. This deduction accounts for out-of-plumb framing and prevents binding against adjacent walls during installation.
Vertical Height Standards for Single and Double-Hang Configurations
Vertical clearance governs rod placement more strictly than depth. Three standard configurations apply directly to sloped layouts:
- Single-hang rods: 66 to 72 inches (168–183 cm) of vertical clearance from the finished floor. Mount these rods in the flat-ceiling section of the closet, or as far back along the slope as the geometry permits. A 66-inch rod clears the floor for shirts, jackets, and most dresses. A 72-inch rod clears full-length coats and gowns.
- Double-hang lower rods: 40 to 42 inches (102–107 cm) from the floor. Used for shirts, folded trousers, and skirts. Most of the working zone under a slope accommodates this height.
- Double-hang upper rods: 80 to 84 inches (203–213 cm) from the floor. Mount these only where the slope or flat ceiling still provides at least 84 inches of clearance. On shallow slopes the upper rod often must be dropped or stepped.
Rule: rod placement follows the available vertical envelope. The rod does not create the space; the geometry already present decides where the rod goes.
Step-down configurations are common and structurally sound: a high single-hang rod transitions to a double-hang pair as the slope descends, then terminates at a low shelf at the eaves. Each step is defined by measuring the local ceiling height, not by following the rod line continuously. A continuous rod under a continuously falling ceiling produces unusable low-clearance segments and is a planning failure, not a hardware limitation.
Structural Anchoring: Why You Cannot Mount Directly to Sloped Drywall
Modular and track-based closet systems — wall-mounted standards, suspension rails, and most off-the-shelf wire shelving — require a flat, vertical back surface for structural anchoring. The mounting hardware assumes the load vector runs perpendicular to a flat wall. An angled drywall surface presents two problems simultaneously:
1. Load vector mismatch. A bracket mounted to angled drywall pulls perpendicular to that angled plane, which means the load vector is no longer vertical. The stud behind the drywall receives a shear component it was not designed to resist over the long term.
2. Drywall compression failure. Standard 1/2-inch gypsum board crushes under sustained point loads in the 30–50 lb range when the load is applied through a toggle bolt or snap-in anchor without backing. Hangers plus clothing regularly exceed that figure.
The mechanical solution is to introduce a flat, level mounting plane before any bracket is attached. The most reliable method: install a horizontal ledger board along the slope first. This board becomes the structural shelf that the rod brackets screw into. The ledger follows the slope but its top face is cut level, providing a true horizontal reference for all hardware above it. Rods, shelves, and standards then anchor into the ledger rather than into the drywall.
For systems requiring vertical back-wall attachment — most modular tracks — mount the track to a flat filler panel that has been scribed to match the slope above it. The filler panel is attached to blocking in the framing behind the drywall, transferring load directly to the studs. The track then attaches to the filler panel as if the wall were plumb.
Mounting hardware into sloped drywall is not a fastening choice; it is a load-path error. The slope forces a non-vertical load vector that gypsum board cannot sustain.
Custom Joinery and Leveling: Creating a Stable Foundation for Racks
When standard modular components cannot resolve the geometry, custom joinery enters the build. Two techniques dominate sloped-ceiling closet construction:
Scribing filler panels. Where the ceiling slope is uneven — common in older homes with non-standard truss spacing — a filler panel is cut to match the exact roofline. The panel is scribed with a compass set to the widest gap, then trimmed flush to the slope. This produces a flat vertical face that meets an irregular angled ceiling without an exposed gap. Panels are typically 3/4-inch plywood or MDF, attached to blocking in the wall studs at 16 inches on center.
Stepped shelving along the slope. A continuous sloped shelf, shimmed level at each stud, creates a usable surface that follows the roofline while remaining horizontal in plan view. Each shim point is loaded vertically into the stud, not into the drywall. The shelf then accepts baskets, folded garments, or closed bins. Stepping occurs at each stud bay: the shelf drops in 3/4-inch to 1-1/2-inch increments where the slope requires it, producing a staircase profile that is structurally continuous and visually quiet.
For heavy hanging loads — winter coats in quantity, workwear, or dense fabrics — specify hardware rated for the static load, not the published dynamic load. A closet rod rated for 50 lbs dynamic will hold that figure under momentary stress but will sag over months of static 40-lb loading. For long-term static loads above 30 lbs per linear foot, specify 1-inch-diameter rods in steel or solid hardwood, mounted into blocking, not into drywall anchors.
Material specification for hardware under sloped conditions:
| Component | Specification | Reason |
|---|---|---|
| Rod brackets | Steel, minimum 12-gauge | Resists shear from non-vertical load components introduced by slope geometry |
| Rod material | 1-inch solid steel or 1-1/4-inch hardwood | Prevents sag under sustained static loading |
| Ledger board | 3/4-inch plywood, structural grade | Distributes point loads across multiple studs |
| Anchors | Into studs or blocking, never into drywall alone | Drywall crushes under sustained hanger loads |
| Finish on steel hardware | Zinc-plated or epoxy-polyester coated | Resists humidity changes common in attic environments |
Final Layout Rule
Plan the sloped ceiling closet in this order and in no other order: define the pitch point, segment the wall into height zones, dimension the depth at each rod location, place rods only where vertical clearance exceeds the relevant standard, and resolve every mounting point into a flat, stud-backed surface before any bracket is attached. Hardware selection follows geometry, not preference. If a proposed rod location fails any one of these checks, that location is shelving, not hanging space — and the build will hold.